search

Monday, October 26, 2020

What exactly is Private DNS?

 Every Android phone since Android 9 (Pie) and above has now a feature, called Private DNS. It has 3 possible options: Off, Custom and Automatic.

1. Off option is clear enough. Your phone uses the DNS server provided by your provider. Meaning, your provider can see what websites you open (if he wants). This should be the fastest option.

2. Custom option is also clear. You set a DNS of your choice. If you are afraid that your provider/government wants to track your browsing habits, you can input a third party DNS server (among popular choices are Google's public DNS servers or CloudFlare ones. That you only the third parties can actually track your browsing habits, so choose wisely.

3. Automatic options is the most interesting one. It is advertised as more secure, encrypted by TLS over DNS. However, your phone's OS is provided by Google. So when you use automatic, you are actually securing your DNS requests over TLS by encrypting them. This makes them invisible (or hard to see) for an external eye. However, this also means that you are sharing them with Google, because the servers it switches to when set to Automatic belongs to Google. So they are only telling you half of the truth.

Here is how to test your DNS settings. If you see a google DNS after scanning, then you are trusting Google. If you see your network provided DNS, then you trust the provider. 

It is clear there is no best option here. But atleast now you knw the whole truth about Google's new option, called: Private DNS. It could be located on different places in your Android menu, but in my case it is located in Settings-> Connection sharing-> Private DNS.


Good luck and happy (and anonymous for most) browsing!

Tuesday, November 20, 2018

How to delete "Other Files" from Xiaomi and free-up space

If you just used your phone without filling it up with pictures, videos, games, apps, or other junk and it still has it's memory filled up, skip to 3.

General space freeing techniques:

1. Uninstall all unneeded apps and games.
2. Delete or move (to SD card, cloud or computer) all pictures, videos, files you don't need.
3. Check your Downloads folder for any e-books, .apk or other files you may have downloaded and forgot there. Storage Analyzer (free) can help determine which files take up most space.

Next step: deleting cached data:

1. Go to Settings->Storage->hold "Cached data" and a prompt will appear. Select "delete". Wait for it to delete and show refreshed free space left.
If you now have enough free space and you don't want to dig deeper, congrats on your new free space!

Advanced file deletion:

Disclaimer: The actions described below can damage the software of your phone, proceed at your own risk!

If you still suffer, open your favorite file manager and search for "photo_blob" files. They are image thumbnail cache of your Gallery. Mine were 400MB each (two of them). Delete them. They will be recreated next time you open your gallery or stock camera app. They will start building up in size again, but it will take a few months before it reaches the same size. The only drawback from deleting is that first time you open your gallery it will take a few seconds to recreate the new image cache.

Another location you might want to check is the MIUI folder. If it's size is in the gigabytes, open it and check size of each folder inside. Usually the Cloud backup stores local files in there, filling up the free space (for some reason).

If you still have gigabytes of mysterious Other files and cannot sleep at night, wandering what are those, go to Expert File deletion.
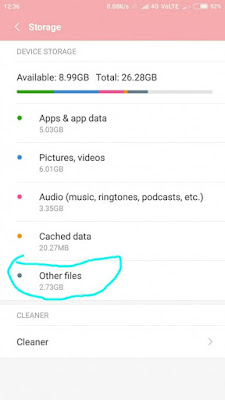
huge "Other files" folder
On my own phone Other files was 6GB.

Expert File deletion: deleting "Other files" (root required)

If you came to this website, you've probably watched at least three videos which didn't help and read that many articles with the same success rate.
Unfortunately next step only works on rooted phones. There maybe some "cleaner app" which deletes this, but since it is accessible only by root, I doubt it. You can try Xiaomi File manager and see if it does the job by some integrated security permissions.

Step 1
Fire up your root application (in my case Super SU).

Step 2
Fire up your favorite root capable File manager (in my case Amaze)
and from it's menu of storage locations select /Root

Step 3. Super SU will ask you if you trust and wish to provide root access to the file manager - agree.

Step 4. Go to /Data/App folder
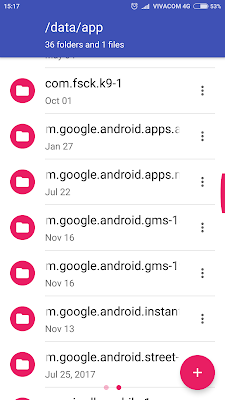
Other files delete
The culprit in Xiaomi's root folder

Unfortunately Amaze did not allow me to check folder size in root folders, so I had to manually check each folder manually until I found the culprit. It was Google Services which was creating backups each time I installed or uninstalled an app. Everyone of them was 200+MB and they were nineteen of them, dated back since I first started using the phone!

Exact naming was com.google.android.gms-1  - Jan 2016
                              com.google.android.gms-2  - Feb 2017
                              com.google.android.gms-3  - Sept 2017
                              ...
                              com.google.android.gms-19  - Nov 2018


 After deleting all of them one by one (Amaze refreshes and kicks me back to the root folder after each folder deletion), the Other files were reduced to only 900MB! That way I reclaimed back more than 5GB! My phone became a lot quicker and also stopped rebooting itself when it is out of memory.
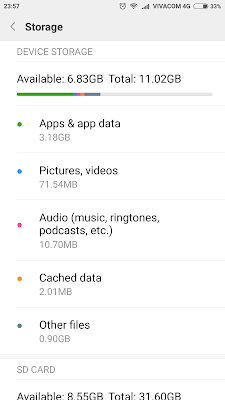
The reclaimed "Other files" view
Final result - Other Filesdecreased to only 900MB!


It might be another app which caused this, so be careful! It is highly recommended to backup your data using TWRP before deleting any root folders as this can make your phone unusable.

With this the space quest ends. This guide should work also on other Android phones. If you have found other ways to free up space on an Android OS, please post in the comments below.


*The first phone reboot after deleting Other Files took about 2 minutes. It appears that Android OS is performing some boot time optimizations for the new free space. Please be patient on the first boot.

Tuesday, June 10, 2014

Windows 7 usb drivers = Access Denied?

Problem - you plug in any usb memory (in my case it was an iPhone).
 The device shows up in device manager, but cannot be installed. The error is "Access Denied". I tried manual install of the USB driver - again Access Denied. I figured out it was something with permissions. Tried to change permissions in the registry - again i was denied access to my own computer! 

After i read all type of "solutions" that did not work, checked if my USB ports work,  finally figured it out. Some toolbar or other malware was the cause for this. So i removed all extensions from the browser, uninstalled everything not needed or of unknown origin, and ran Mbam. This free tool scanned my machine and found 23 files and registry entries living inside my machine. Removed all of them and after the first reboot my iPhone was recognized and installed succesfully! Good luck!

Friday, January 11, 2013

How to enter BIOS on Windows 8 PC (Die UEFI, Die!)

Old PC users like to control things - one of them is the way and order their operating system loads. That's why you might be terrified to know, that Windows 8 + UEFI compatible motherboard or laptop, equals zaro control of BIOS.
 The reason for that is that UEFI (Unified Extensible Firmware Interface) connects your UEFI compatible OS (windows 8) with BIOS on a very low level, which allows you to control BIOS directly from your OS.

So, you (for some reason) hate that UEFI thing and want to do whatever you like with your laptop or desktop PC.
If you cannot enter bios on a windows 8 factory installed PC or notebook, follow these steps:

1. Enter Windows 8, start typing BIOS and the search field will appear. Select Settings below, type bios in the search field, click on the only option available (advanced startup options).

2.Select General, scroll down to the bottom and select Advanced startup-> Restart now

3. Then select Troubleshoot, then Advanced Firmware settings ->Restart

4.After that you can see the lovely "press some key to configure BIOS". In bios, find and disable UEFI (switch to legacy) boot.

Good luck!

Wednesday, November 21, 2012

How To Fix Broken Goclever Tab i70 Android Instalation

If your Goclever Tab i70's android software has been damaged for some reason, and the only thing you can do is bang it against your head, then here is how you can make it come back to life again.

1. Make a hard reset - press the reset button on the back cover. If no luck, proceed to step 2.
2. Prepare your micro SD card:
3. Make sure you have card reader that works correctly with big microSD cards (4, 8, 16GB..). For this operation you need only 1Gb card. Remove all removable flash drives from your computer. Leave only your microSD card.
4. Delete any partitions on it. (right click on My Computer / Computer ->Manage->Disk Management-> select your microSD card and click the X button on top, select Yes)

5. Download latest software http://download.goclever.net/serwis/tab/tab_i70_am.zip (you might want to check for a newer version on Goclever's website ).
6. Unzip it.
7. Run IUW1.2.exe from the  extracted content.
8. Select Boot Disk, then browse for the software file I70_22_AM.ius
how to create bootable android image
IUW screen

If you have left only your microSD card in your computer, then there is only RemovableMedia1.
9. Press Burn
10. After the process is complete, insert the card in your charged Goclever tab i70 and press Power button.
11. If all went as it should, just touch the screen to start the install process.
12. When finished the tablet will ask you to eject the SD card and to reboot it.
13. To make your SD card usable again, just delete the current partition and create a new one with the card's full size. It must be in FAT32 format.
14. You're welcome :)


P.S. This procedure is very similar with most tablets with Android Froyo. It might help you understand how to do it with your specific device.

Saturday, November 10, 2012

How to remove Babylon search bar (completely)

babylon search bar removal
How to remove the Babylon Toolbar
You have allready tried to uninstall it the normal way and it didn't work. That's why you're reading this. It is a very annoying software that slows down your browser, offers you websites it wants you to visit, replaces your default search engine and stucks inside your browser after uninstall.

1. Uninstall it the normal way (from control panel).
2. Delete C:\Program Files\Babylon
3. Delete all XML files exept the one that corresponds to your favorite search engine (e.g. google) from C:\Program Files\Mozilla Firefox\Searchplugins
4. Make hidden and system files visible, open C:\Documents and settings\*your username\Local Settings\Application Data\ and delete any babylon folders there (WinXP)

- C:\Users\*your username\AppData\Local for Win7

5. Open Firefox->Tools->Addons->Extentions and delete any leftovers of Babylon toolbar
6. Type about:config in the adress bar and press Enter. Promise you'll be carefull and type babylon in the search field.
7. Right click on extensions.BabylonToolbar.firstRun and select Toggle.
8. Right click on keyword.URL and select Modify. Then paste " http://www.google.com/search?ie=UTF-8&oe=UTF-8&sourceid=navclient&gfns=1&q= " to replace the Babylon search bar link.
9. Return to default all other modified lines.
10. Set default start page from Tools menu.
11. Close everything and start Mozilla Firefox again. It should be fixed.


For Internet Explorer users: Open IE browser, click on "Tools", "Internet Options" and in the section "Tabs" click "Settings". It will open a new window, on the option "When a new tab is opened, open: "in the drop-down menu please choose "Your first homepage". Then click OK, Apply and OK again.

*Users informed me, that sometimes there is a seperate process running on windows startup which adds again babylon or other search malware every time windows loads. Please remove any useless entries from your startup. Press  Winkey+R, msconfig and press enter. Uncheck any startup items you don't need.

Friday, November 2, 2012

Samsung notebook hotkeys not working

Samsung Notebooks

This is a one of those common annoying problems, caused by lazy support sites. After reinstalling Samsung laptop, the brightness +/-, wireless on/of switch, etc. are not working. You start wondering if there is a driver for that on Samsung's support website. Well there might be, but it's not where it is supposed to be.

 So just follow this link and download Samsung Easy Display Manager driver for Windows 7. It works for both 32 and 64-bit Windows and it is free.
Then just decompress and install the driver and after the first reboot you'll have those shiny OSD menus and more important - working hotkeys!

P.S. This driver is tested on Win7 64 & 32-bit, Samsung laptop model: NP300e5z.